记一次用wsl2中共享宿主机的代理-v2rayN
起因
在公司中使用Windows系统, 开发中使用WSL2并装了Ubuntu22.04系统, 在Linux系统中使用拉取各种包时会出现大量超时, 导致工作效率非常低下.
在WSL2中设置
- 在
WSL系统查看宿主机IP和端口, 使用命令:ip route | grep default | awk '{print $3}, 在v2ray主界面可以看到http代理端口. - 设置代理脚本
# 添加http/https代理, apt代理, git代理
export hostip=$(ip route | grep default | awk '{print $3}')
export hostport=10809
alias proxy='
    export https_proxy="http://${hostip}:${hostport}";
    export http_proxy="http://${hostip}:${hostport}";
    export all_proxy="http://${hostip}:${hostport}";
    git config --global http.proxy "http://${hostip}:${hostport}"
    git config --global https.proxy "http://${hostip}:${hostport}"
    echo -e "Acquire::http::Proxy \"http://${hostip}:${hostport}\";" | sudo tee -a /etc/apt/apt.conf.d/proxy.conf > /dev/null;
    echo -e "Acquire::https::Proxy \"http://${hostip}:${hostport}\";" | sudo tee -a /etc/apt/apt.conf.d/proxy.conf > /dev/null;
'
alias unproxy='
    unset https_proxy;
    unset http_proxy;
    unset all_proxy;
    git config --global --unset http.proxy
    git config --global --unset https.proxy
    sudo sed -i -e '/Acquire::http::Proxy/d' /etc/apt/apt.conf.d/proxy.conf;
    sudo sed -i -e '/Acquire::https::Proxy/d' /etc/apt/apt.conf.d/proxy.conf;
'
这样就可以使用以下命令设置
# 设置代理命令
proxy
# 删除代理命令
unproxy
在宿主机中设置
- 设置
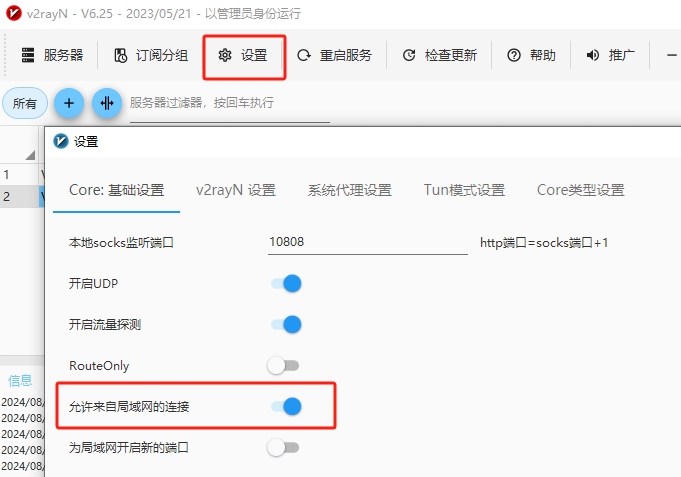
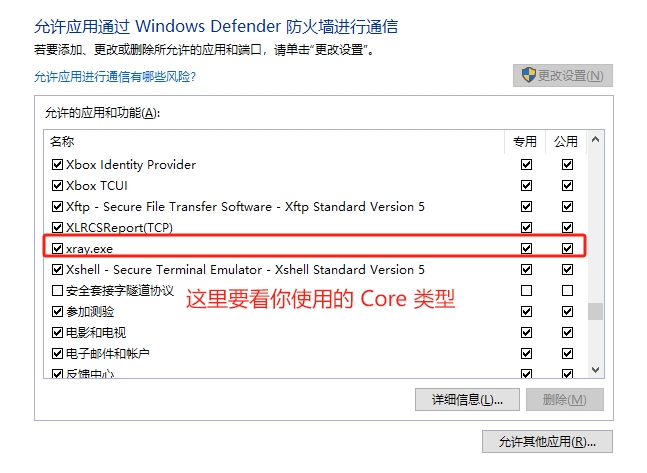
V2ray允许局域网连接. - 防火墙例外信任(重要,容易被忽略), 这一步是最重要的一步, 也是最坑的一步, 需要在Win10防火墙中允许V2ray进行公用和专用网络的访问! 只要设置这个就可以了, 不需要调整过其他设置!


调试
在WSL2中输入 curl -vv www.google.com 验证是否正确访问谷歌.
扩展阅读
记录一次WSL2的网络代理配置
WSL2 使用 V2RayN 局域网 proxychains 代理方案
最后更新于 2024-08-16 09:09:23 并被添加「」标签,已有 9673 位童鞋阅读过。
本站使用「署名 4.0 国际」创作共享协议,可自由转载、引用,但需署名作者且注明文章出处
此处评论已关闭